REALLY QUICK HOT ROASTED FISH

posted on: November 29, 2012

This recipe was originally developed by my inspirational chef Jamie Oliver for his 30 minute meals. Usually I never take a recipe and just cook accordingly but change it here and there and sometimes so much that only the name of the dish remains the same.

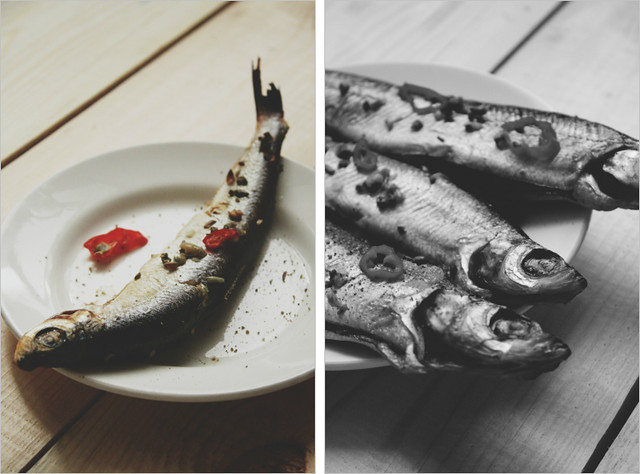
Here I just took it and made it. The recipe is originally made with sardines but it goes greatly with other small fish like cod or vendace either. I took vendace, I love this fish for its almost sweet tender taste.

Quick Hot Roasted Fish

Ingredients:

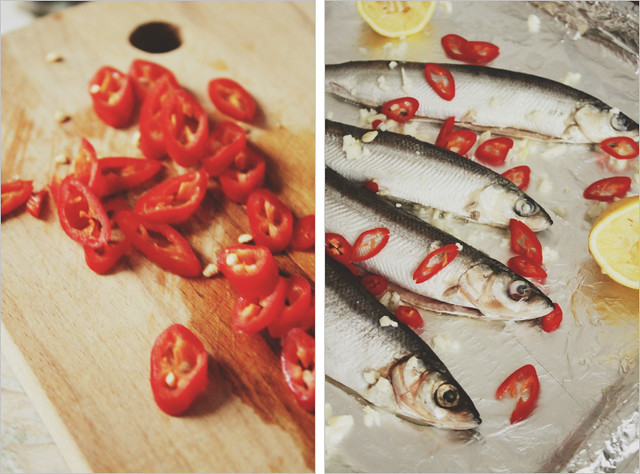
4-5 small fish, scaled and gutted (about 85 g each)
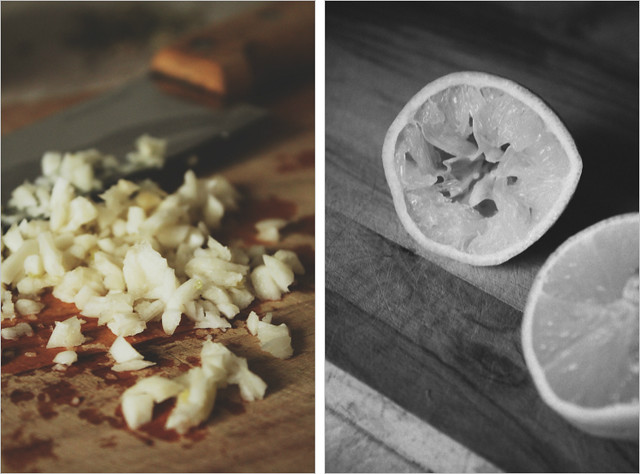
4 garlic cloves
1 lemon
1 fresh red chilli
a bunch of flat-leaf parsley
1 teaspoon fennel seeds
extra virgin olive oil
sea salt and freshly ground black pepper

Method:

Preheat the oven to 220 C. Place your fish into a large baking tray.

Quick Hot Roasted Fish

Smash and roughly chop your garlic and add it your baking tray. Squeeze a whole lemon over the fish and add the halves to the tray, cut side up. A tip how to easily squeeze a lemon (particularly important for women): roll a lemon at the table, pressing it down with your hand. It will soften and the juice will just come out at once as you cut it!

Quick Hot Roasted Fish

Finely slice your chilly, remember to deseed it if you don't like your fish too hot, and add the chilly to the baking tray.

Quick Hot Roasted Fish

Take your parsley, chop the stalks, reserve the leaves. Add the chopped stalks together with fennel seeds to the baking tray, sprinkle with sea salt and freshly groung black pepper and generously add good quality olive oil.

Quick Hot Roasted Fish

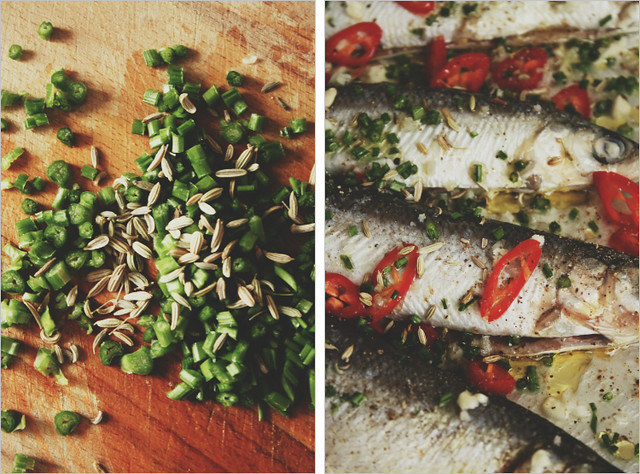
Now toss the fish with your hands, so that all you've added to the tray gives the most of their flavor to the fish. Place the tray to the top shelf of the oven and roast your fish for around 15 minutes until it's golden and crispy.

Quick Hot Roasted Fish

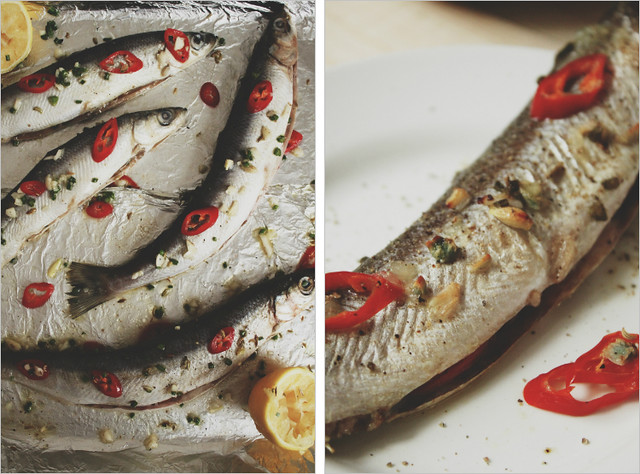
Serve with a simple vegetable side salad. Just take any fresh vegetables that you have in your fridge, chop them along with the parsley leaves that you reserved earlier and dress them squeezing the juice remaining in roasted lemons.

Bon Appétit!


Нажмите "Continue" для рецепта на русском языке >>

CARAMELIZED BALSAMIC ONIONS

posted on: November 27, 2012

Speaking of appetizers, I always do my best to make them as light as possible - you really don't want to get your fill before the main dish is served.

One of my favourite appetizers which is always a great success is caramelized onions. Though it's somehow a tricky thing I advise you to give it a try, once you make it right - you will not be able to stop cooking it.

Balsamic Caramelized Onions

Ingredients (serves 2):

1 cup onions
1 tablespoon brown sugar
2 tablespoons balsamic vinegar
1 garlic clove
1 teaspoon thyme leaves
good quality olive oil
a pinch of sea salt

Method:

First tip is to collect as many forms, colors and sizes of onions as possible. Take red, white, yellow, pearl, baby onions - you will win. Cut the big ones thinly lengthwise, small ones - in halves, even leave the smallest ones whole.

Smash and roughly chop your garlic. Heat olive oil in a big pan over low heat, add thyme leaves and garlic to the pan and stir them to give their flavour to the oil. It's important here to choose good quality olive oil as it gives much of its flavour to the final dish. Add the onions and a pinch of sea salt and cook them until all the liquid has evaporated and the onions are soft, it will take 10-15 minutes. Stir constantly to prevent from burning. After that add sugar and balsamic and cook stirring constantly for another 5-10 minutes until the onions caramelize.

Another important tip here is to choose the widest pan you have and cook onions in one layer, not more. If you overcrowd your pan the onions will be sweating and boiling but not evaporating any moisture, you will just have to throw it all away. So take a wide pan and you will get it right.

When cooked the onions get incredible sour-sweet taste, they are juicy inside and in some places have a crunchy sugary crust. Serve them with fresh buns or crackers, it tastes just like heaven.

Balsamic Caramelized Onions

Bon Appétit!

Нажмите "Continue" для рецепта на русском языке >>

MUST-TRY HUMMUS AND TORTILLA CHIPS

posted on: November 23, 2012

Hummus is an all-time favourite of Mediterranean cuisine. Being a huge fan of hummus I though had to spend a plenty of time trying to find a perfect recipe.

Once I happened to find myself in a Druzean village in the Middle East. So they served such an incredible hummus there that it remained the best for me till I developed this recipe. It was so smooth and mild and tender and it felt like it was going to crumble to dust in the mouth as if it was dry though it was moist and juicy. Really weird-tasting, this case when you love imperfection just because it's so unexpected and unlikely to be.

I remember my first home-made hummus which I cooked with my hands only as I even didn't have a simple food processor at that time. It was chunky, it contained a questionable quality tahini but it was an absolute victory over it's store-bought brother. Seriously, don't buy hummus in supermarkets, it's so quick and easy to make and the difference is just huge. Once you try it - you never buy it anymore.

Classic Hummus

Ingredients (serves 5):

For the hummus:

1 cup dried chickpeas (makes 2 cupes cooked)
1 teaspoon baking soda
water for soaking the chickpeas
juice of half a lemon (3-4 tablespoons)
2 cloves of garlic
2 heaping tablespoons tahini paste
1 1/2 teaspoons sea salt
1 tablespoon extra virgin olive oil
150 ml of cooking liquid (reserve when you cook the chickpeas)
1/2 tsp ground cumin
1/2 tsp turmeric (curcuma)


For tortilla chips:

5 tortillas (click here for a great home-made whole wheat tortillas recipe)
olive oil
sea salt flakes

Method:

Wash the chickpeas, place them in a bowl, add baking soda, cover with 5 cm of water and soak overnight. Baking soda is great here because it helps the water to get deeper into the chickpeas and save you much time of cooking.

After that the chickpeas will double in size, so you will definitely know it's enough of soaking. Wash them again, place in a pan, add water (twice as much as the chickpeas), bring to the boil and cook over medium heat untill the chickpeas soften (about 10 min). Drain the chickpeas reserving the cooking water. Optionally reserve some of the chickpeas for serving.

Classic Hummus

In a food processor pulse the chickpeas, lemon juice, garlic, tahini paste and olive oil. Start to add cooking liquid slowly until you get the desired thickness of your hummus. For us 150 ml were enough. At the end add the spices (by the way, ground cumin really gives the taste here but turmeric is more for the warm color). Puree the hummus till it's smooth.

Classic Hummus

To make tortilla chips preheat the oven to 180 C. You can use store-bought tortillas but here I have a gorgeous recipe of whole wheat tortillas which you can make ahead and keep in the freezer until you need them. It's your choice but I tend to stick to home-made stuff, I just love it.

Line a baking tray with parchment paper, spray it with olive oil. Take your tortillas, cut them into small triangles and place them to the baking tray in one layer. Either spray or brush them with just a bit of olive oil and sprinkle with sea salt. Toast in the oven for 10 minutes until golden and crispy. Looks like the healthiest chips you've ever seen, yeah?

Classic Hummus

To serve the hummus, place it in the plates, sprinkle with olive oil, paprika, chopped greens and nuts, place a few chickpeas on top, there's a huge variety of options so you're free to decide how you want to see it. Don't forget your freshly made tortilla chips - they are hummus' best friends!

Bon Appétit!

Classic Hummus

Нажмите "Continue" для рецепта на русском языке >>

CARROT GINGER SOUP

posted on: November 22, 2012

This soup is a perfect warmer for any cold season meal. It's light, it's low-calorie, at the same time it's still comforting and so pleasant to eat. The ginger gives the soup incredible warmth that goes straight to your heart while you receive vitamins and fiber from carrots and apples, it's like a brand new comfort take on vitamins, you should definitely give yourself this treat!

Carrot Ginger Soup

Ingredients (serves 5):

4 medium carrots
1 medium apple
2 cm long ginger root
1 big onion
1 tablespoon thyme leaves
sea salt and freshly ground black pepper
olive oil
Worcestershire sauce, chopped parsley and almonds to serve

Method:

Roughly chop your carrots, apple and onion, peel and finely chop the ginger root. Heat olive oil in a big heavy-bottomed pan over medium heat. Add the chopped vegetables to the pan along with thyme leaves, add sea salt and pepper and cook over medium heat covered with a lid stirring occasionally for 20-25 minutes until the apple breaks down and the vegetables start to brown.

After that pour in the pan just enough water to cover the vegetables. Bring to the boil and cook over low heat stirring occasionally until the vegetables are soft. When done remove from the heat and puree in a blender.

Carrot Ginger Soup

Serve with a few drops of Worcestershire sauce, chopped parsley and almonds and fresh bread. Parsley and almonds are really an option but I highly recommend using Worcestershire sauce as it perfectly balances the overall sweetness of the soup.

Carrot Ginger Soup

Bon Appétit!

Нажмите "Continue" для рецепта на русском языке >>

THE SOFTEST GARLIC KNOTS EVER

posted on: November 20, 2012

Garlic Knots are an awesome way to enrich any meal using them instead of regular breads. Certainly a properly and freshly baked bread is a great treat itself, needless to say it's a great addition to a dinner but there are moments when you want your bread in a special way. And here come these softest garlicky little buns, absolute love. Everyone will adore them!

049 Garlic Knots

Ingredients (makes 60-65 knots):

For the dough:

3 cups bread flour
1 cup whole wheat flour
300 ml lukewarm water
1 tablespoon sugar
4 tablespoons olive oil
1 tablespoon sea salt
1 1/2 teaspoon dried yeast

For the glaze:

6 tablespoons olive oil
2 garlic cloves
1 teaspoon thyme leaves
2 teaspoons dried oregano

Method:

In a cup mix water, sugar and yeast and let it stand for a while to let the yeast start working. Sieve the flours and salt on to a work surface and with a hand make a well in the middle. After the liquid mixture becomes bubbly pour it into the well and start mixing it into the flour first with a fork, then with your hands, you will feel when it's time to switch to the hands - it will be simply too hard to use a fork. When combined add olive oil and knead smooth, soft and elastic dough.

Not feeling sure about kneading the dough by yourself? Or maybe you're short of time? No problem! Use a food processor! I honestly love kneading the dough but there's no shame to turn to automatic kneading, that's what these machines were invented for!

046 Garlic Knots

Place the dough in a large oiled bowl, turn it to coat, cover with a damp cloth or plastic wrap and set aside in a warm place for about an hour until the dough has doubled in size.

Remove the dough from the bowl to a flour-dusted surface and knead it again to push the air out. The dough is done: use it immediately, freeze it or keep in the fridge until required.

For our buns divide the dough up into little balls around 3 cm in diameter, you will get about 60-65 balls. Keeping the balls covered with a towel to prevent them from drying shape each of them into a rope and tie into a knot bringing the end lying on the top underneath the knot.

Place the knots to a baking tray lined with parchment paper and lightly floured, cover with a kitchen towel and let rise for another 50 minutes.

047 Garlic Knots

Bake the knots for half an hour at 180 C.

To make the glaze heat olive oil in a pan over medium heat. Smash and chop garlic and add it to the pan along with the herbs removing the pan from the heat immediately. We do not want to fry garlic but we want it to become soft and tender and to give the herby-garlicky flavour to the oil.

Cover the knots with the glaze, sprinkle with sea salt flakes and dig in. Absolute love.

048 Garlic Knots

Bon Appétit!

Нажмите "Continue" для рецепта на русском языке >>

BEST FOR BREAKFAST APPLE CHOCOLATE GRANOLA

posted on: November 15, 2012

I just love to have a bowl of home made granola for breakfast. With fresh milk or natural yoghurt it is the best way to start a day with a filling nutritious wholesome meal full of love and energy. Should I say it's also a nice sweet treat?

Here is how you make it.

045 Apple Chocolate Granola

Ingredients:

2 cups oats
1/3 cup roughly chopped almonds
1/3 cup roughly chopped dates
1/2 cup dried cranberries
1 tablespoon chia seeds
1 tablespoon flax seeds
1 1/2 tablespoon sesame seeds
2 big apples cut in halves
1 tablespoon honey
3 tablespoons olive oil, plus a little more
1 teaspoon cinnamon
1/2 teaspoon ground ginger
1/2 teaspoon ground cloves
2 tablespoons cacao powder
1 teaspoon sea salt

Method:

Preheat the oven to 180 C. Roast your apples for 40-45 minutes until they soften.

Oil a baking tray lined with parchment paper. Toss your oats, almonds, chia seeds, flax seeds and sesame seeds in a bowl and transfer them to the baking tray. Toast them for 10 minutes until they get a nutty flavor. Turn the heat down to 150 C.

In a food processor puree your roasted apples, then add honey, spices, cacao and salt. Pour the mixture over the oats and mix evenly, then add dried fruit.

Bake for ~1 hour until the granola gets golden color stirring every 10-12 minutes to make sure all sides of granola get toasted.

044 Apple Chocolate Granola

Store your granola in airtight containers.

The beauty of home-made granola is that you totally adjust it to your taste picking the ingredients you love. You can make it with apples, or pumpkin, or maple syrup, add any nuts you love, pick any dried fruit, add your favorite spices and certainly omit excess sugars and fat. It's all about your fantasy: if you love the ingredients you picked then you'll love your granola!

Bon Appétit!

042 Apple Chocolate Granola

Нажмите "Continue" для рецепта на русском языке >>

HOME-MADE WHOLE WHEAT FLOUR TORTILLAS

posted on: November 14, 2012

There is a permanent tendency in my family to make things ourselves rather that buy those in supermarkets. Food should not be impersonal when it can be made with soul and love.

To be honest, sometimes it's quite a challenge to make something yourself and get a much better result that it's in a supermarket and not to regret about the time spent on an effort.

Particularly I am talking about tortillas. What can be more obvious to buy than flour tortillas? Just imagine all the time making the dough (and it must not be as tender as for bread!), rolling out each and every peace, and where are we supposed to cook it? Does everybody has a wood-burning stove at home? I personally don't!

And still I go for it. I go for the soul in the kitchen, I go for healthier personal food.

Now I go for whole wheat flour tortillas.

036 Whole Wheat Flour Tortillas

Ingredients (makes 16 tortillas):

2 cups whole wheat flour
1 cup all-purpose flour
5 tablespoons olive oil
2 teaspoons baking powder
1 heaping teaspoon sea salt
1 cup water at room temperature

Method:

Combine the flour, baking powder, sea salt and olive oil in a bowl or a food processor.

033 Whole Wheat Flour Tortillas

Pulse it or work it with a fork or your fingers until the mixture becomes crumbly. Then slowly add the water until the dough comes together in a firm ball. Carefully add some more flour/water if your dough is too sticky or dry.

034 Whole Wheat Flour Tortillas

With a knife divide your dough into 16 equal parts (first divide it into halves, then every half into halves and so on). These will be our future tortillas.

035 Whole Wheat Flour Tortillas

On a floured surface roll out every piece into a thin circle ~20 cm in diameter. Do it one by one and keep the rest covered to prevent them from drying out.

Heat a heavy bottomed frying pan and cook the tortillas one by one, each side ~15 seconds until it browns slightly. Turn the heat down or up if tortillas start to burn or cook too slow.

You're done! I usually freeze these tortillas and use them when needed. Surprisingly home-made tortillas turned out to be this much more tasty and tender that store-bought ones. And needless to say how much healthier!

Bon Appétit!

037 Whole Wheat Flour Tortillas

Нажмите "Continue" для рецепта на русском языке >>

PERFECT SLOW ROASTED TOMATOES

posted on: November 13, 2012

Every autumn for me begins with slow roasted tomatoes. It's all about what you love in taste and flavor of tomatoes.

In particular not only I love the result but also the very process of slow roasting of tomatoes. The process of changing of color and texture of tomatoes, and the flavor that fills your house while tomatoes are being cooked.

038 Slow Roasted Tomatoes

Ok, here's how you make it.

Ingredients (to fill 1 medium baking sheet):

20-25 super ripe plum tomatoes
3 tablespoons dried oregano
1 heaped tablespoon dried basil
2 teaspoons dried paprika
1 teaspoon freshly ground black pepper
olive oil

Method:

Preheat the oven to 100-110 C.

Wash and dry your tomatoes and cut them in halves lengthwise. Put them in a large bowl and add the spices and herbs. Generously add olive oil and toss to cover all the tomatoes with herbs. Line a baking sheet with parchment paper and lay your tomatoes cut-side down. Place the baking sheet in the oven and have patience to wait for 6-8 hours for tomatoes to cook.

Slow roasted tomatoes

Speaking of herbs and spices you actually can use whatever you love. Here I give an example of what's definitely good: basil and oregano excellently go with tomatoes and paprika adds a little smokey effect which tastes just like heaven.

040 Slow Roasted Tomatoes

After a couple of hours of roasting the tomato skins will start to wrinkle up, there appear some bubbles of air under the skins as if they are breathing, and here the best part of the process begins.

Imagine that your house if filled with a thousand ripest tomatoes, then multiply it by one more thousand as if all the tomatoes in the world are smelling in your house at the moment. Even the best tomato paste can't compare with this concentrated tomato flavor coming from the oven.

039 Slow Roasted Tomatoes

In 6-8 hours (depending on your oven) the tomatoes will be done. Dark red little pieces of heaven, a whole summer in a bite.

041 Slow Roasted Tomatoes

Нажмите "Continue" для рецепта на русском >>
Powered by Blogger.

GOOD FOOD All rights reserved © Blog Milk Powered by Blogger