WINTER SQUASH BAKED FALAFEL

posted on: December 26, 2012

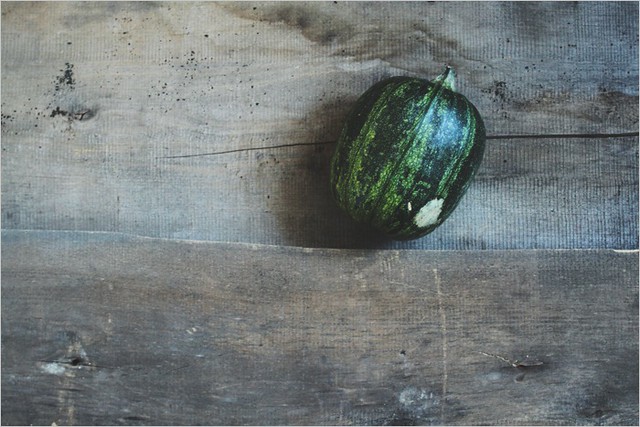
Falafel is a second (after hummus) favourite of Mediterranean cuisine. Also mainly made of chickpeas it still leaves some space for enlightening the whole dish. What I love to do is simply substitute half of the chickpeas with some seasonal vegetables like zucchini or squash. The main trick here is that you will not even taste this substitution - you will taste classic falafel. While your body will receive half of its "classic" calories and twice as much as its "classic" fiber.

Baked Falafel

Ingredients (serves 2-3):

1 cup dried chickpeas
water and baking soda for soaking the chickpeas
1 small red onion
1 cup winter squash, shredded
a small bunch of cilantro and parsley
3 garlic cloves
1 teaspoon ground cumin
1 teaspoon sea salt
2 tablespoons extra virgin olive oil
freshly ground black pepper

Method:

Wash your chickpeas and place them into a bowl. Add 1 teaspoon of baking soda and 2 cups of water and soak overnight. The next day your chickpeas will double in size.

Preheat the oven to 200 C.

Baked Falafel

Wash and rinse the chickpeas and place them into the bowl of your food processor. Add chopped onion, garlic, cilantro and parsley, shredded squash, cumin, sea salt and freshly ground black and a couple of tablespoons extra virgin olive oil. Process until the mixture is smooth.

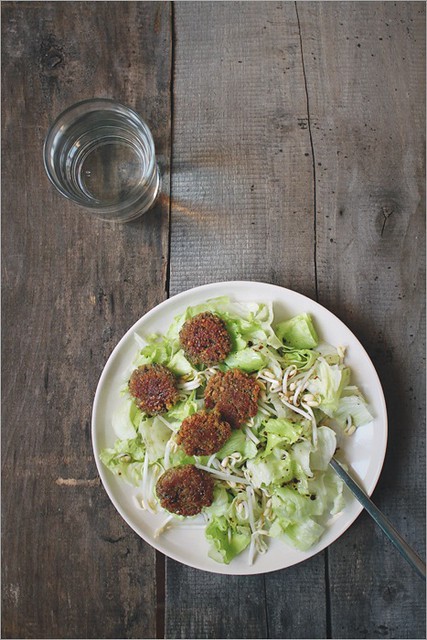
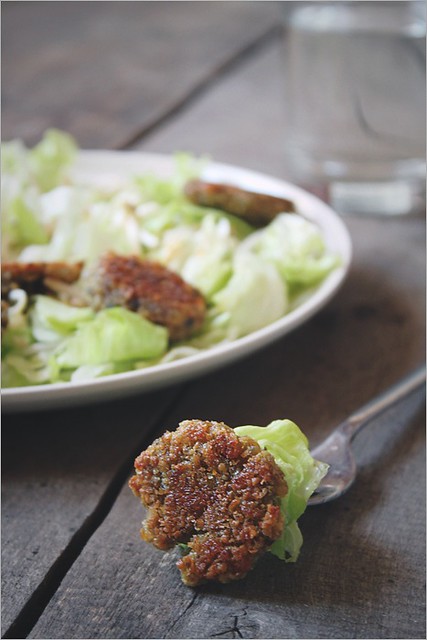
Spray or brush your baking tray with a little olive oil. With your hands form little patties of falafel taking 1 heaped teaspoon of the mixture at a time. You will make about 25 patties (~4 cm in diameter, 1 cm thick).

Transfer them into your baking tray and bake for 15 minutes. Then put the tray out of the oven, flip the falafel and bake for another 15 minutes.

Baked Falafel

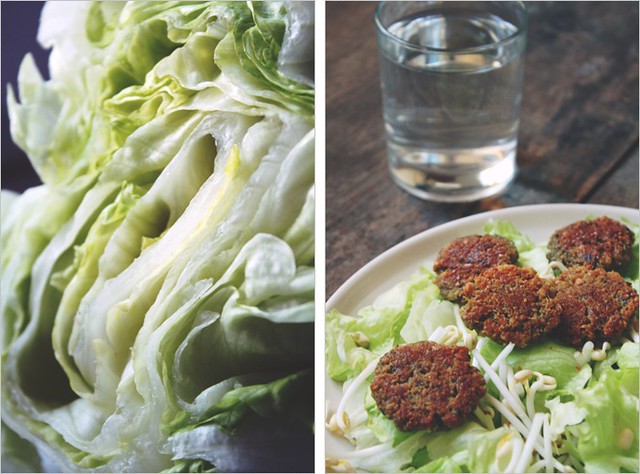
Serve your falafel on a simple green salad with a classic dressing (1 part mustard/vinegar/lemon juice : 3 parts olive oil plus salt and pepper). A perfectly balanced dinner!

Bon Appétit!

Baked Falafel

Нажмите "Continue" для рецепта на русском языке >>

SWEET AND SOUR BRAISED CABBAGE

posted on: December 24, 2012

Light, flavourful, full of dietary fiber, low-calorie - the dish is a perfect side for any meat. Makes a great detox meal itself after holidays. A must-try for everyone!

Sweet and Sour Braised Cabbage

Ingredients (serves 5):

1 red cabbage
2 sweet apples
1 yellow onion
1 tablespoon fennel seeds
150 ml apple sider vinegar
olive oil
sea salt and freshly ground black pepper

Method:

Thinly slice your onion, cut apples into small cubes and cabbage - the way you like it. Heat olive oil in a heavy-bottomed pan over medium heat, add onion and fennel seeds and cook until golden for a couple of minutes. After that add apples and cabbage and pour in the vinegar, mix well, cover your pan with a lid and turn the heat down. Cook your cabbage for an hour over low heat frequently stirring.

The cabbage will be soft and tender and will absorb the sweetness of apples and the sourness of the vinegar. A great yet simple winter dish!

Bon Appétit!

Sweet and Sour Braised Cabbage

Нажмите "Continue" для рецепта на русском языке >>

ITALIAN FOCACCIA AND FOUR TOPPING IDEAS

posted on: December 10, 2012

My culinary story began with making breads. I got a bread machine and after a couple of weeks experimenting with it itself I found out it was much more fun to make bread from scratch with your hands and the oven only. And there it all began... French I came across Italian focaccias which immediately became my favourites. Being rather thin and at the same time combining soft crumb and crispy crust they are like all the goodness of breads in one little piece. Plus oily texture of the dough makes the most tender flavour one can imagine. Absolute love.

Focaccia - 4 Toppings

Ingredients (makes 4 focaccias ~15 cm in diameter):

2 2/3 cups bread flour
1 1/2 teaspoon sea salt
1/2 tablespoon brown sugar
1 cup lukewarm water
3 tablespoons olive oil
7 g active dry yeast
2 tablespoons olive oil and 2 tablespoons cold water for brushing

Method:

First make the dough. Sift the flour and salt on your work surface and make a well in the center. Add sugar and yeast to the water and set aside for a minute for the yeast to start working. After the liquid becomes bubbly pour it into the well and start mixing the flour into the liquid with a fork. When it becomes too hard to work with the fork flour your hands and continue mixing with your hands. Knead the dough for approximately 10 minutes until it becomes smooth and elastic.

Place the dough into an oiled bowl, cover with a kitchen towel and set aside in a warm place to rise for an hour.

In an hour the dough will double in size. You will have to knead it once more to let all the bubbles of air out. Now the dough is ready to work with.

Focaccia - 4 Toppings

Divide it into 4 parts and with your hands only form flat circles of your future focaccias. They can be not ideal circles, it doesn't matter, but they should be rather thin - not more than 1 cm thick.

Preheat the oven to 250 C and place your focaccias into a baking tray lined with parchment paper and lightly floured. Then with your fingers press the dough down a bit so that you'll leave several "fingerprints" on focaccias.

Focaccia - 4 Toppings

Mix 2 tablespoons of olive oil and 2 tablespoons of cold water in a cup until emulsified. With this liquid generously brush your focaccias. After that you can either put them into the oven or add a topping and then bake.

Here I chose 4 different toppings for our focaccias:


      Focaccia - 4 Toppings

      Let your focaccias rise a bit for 20-25 minutes and then put them into the oven and bake for 20 minutes until golden and crispy. After 10 minutes of baking remove from the oven and either carefully brush the breads with mixture of oil and water or if you're feeling you can make a mess in a way your toppings are arranged - simply spray the focaccias with olive oil and return them to the oven.

      Focaccia - 4 Toppings

      What you get now is 4 incredibly flavourful tender breads, mild inside, crispy crust, comforting, filling and simply adorable. Get your family together and dig in!

      Focaccia - 4 Toppings

      Focaccia - 4 Toppings

      Bon Appétit!

      Нажмите "Continue" для рецепта на русском языке >>

      DAIRY FREE HANUKKAH MINI DONUTS WITH QUICKEST CHOCOLATE GLAZE

      posted on: December 6, 2012

      When it comes to Hanukkah I get so excited about the holiday itself, the time full of miracles, traditional dishes, candles every evening. Hanukkah time is so full of family spirit and intimacy, this is the warmest holiday of the year.

      What you can't imagine Hanukkah without is definitely sufganiyot - holiday donuts. Everyone is just crazy about them. I make the same recipe of sufganiyot the second year in a row: last year's donuts were so good that I definitely want more!

      Dairy Free Hanukkah Mini Donuts

      Ingredients (makes 20 mini donuts):

      For the donuts:

      1 3/4 cups all-purpose flour
      1/2 teaspoon salt
      10 g active dry yeast
      1/4 cup orange juice (unsweetened)
      1 1/2 tablespoon brown sugar
      1 1/2 tablespoon olive oil
      1 large egg, lightly beaten
      1/2 teaspoon vanilla extract
      corn oil for frying

      For the quickest chocolate glaze:

      1/4 cup good quality cocoa powder
      1/4 cup caster sugar
      100 ml water
      2 teaspoons olive oil

      Method:

      To make the dough with your hands, sift the flour, active dry yeast and salt on your work surface and make a well in the middle. In a cup lightly beat the egg, add olive oil, orange juice, sugar and vanilla extract and mix well. Pour the liquid in a well in the flour and start mixing it with a fork, then with your hands until you get rather soft elastic dough.

      If you use a food processor simply add all the ingredients to the bowl and mix them until the dough forms.

      The dough will be very soft but because of much oil it will not stick to the hands. Place the dough in a bowl, cover with a kitchen towel and set aside in a warm place to rise for an hour.

      When the dough has doubled in size knead it a bit to let the air bubbles out and roll it out on a floured surface into a 7-8 mm thick layer. Cut the dough into 5-6 cm diameter circles, then cut smaller holes in the center of every circle. Roll out the scraps and cut more doughnuts. Repeat until you use all of your dough.

      Dairy Free Hanukkah Mini Donuts

      Set the donuts aside to rise in a warm place and prepare the glaze. Simply combine cocoa powder and caster sugar in a small pan, add water and bring it to the boil over medium low heat stirring constantly. When it starts to boil remove immediately from the heat, add the oil and mix it thoroughly until emulsified. Set aside to cool.

      Dairy Free Hanukkah Mini Donuts

      Heat a heavy-bottomed pot with about 3 cm of corn oil to 180 C. Carefully place 2-3 donuts in the oil and fry each side until golden. Remove from the pot and drain on a plate lined with paper towels.

      Cover your donuts with chocolate glaze and powdered sugar and enjoy in the family circle telling about Hanukkah miracle!

      Dairy Free Hanukkah Mini Donuts

      Happy Hanukkah and Bon Appétit!

      Нажмите "Continue" для рецепта на русском языке >>
      Powered by Blogger.

      GOOD FOOD All rights reserved © Blog Milk Powered by Blogger